For me, setting up a WordPress blog was one big struggle.
I hated figuring out all of the technical jargon. I didn’t understand what to do (or how).
It was so freakin’ confusing that I almost gave up!
Well… I’m certainly glad I didn’t give up. Otherwise, we wouldn’t be here now.
I wouldn’t have had the chance to:
- Impact millions of readers with this blog
- Get cited by The New York Times, The Wall Street Journal, CNN, Forbes, and more.
- Meet really cool entrepreneurs and changemakers
- Earn a great income doing what I love

In the last several years, I’ve been blessed with a ton of success at an early age, and I owe it all to that very first decision to start a WordPress blog.
Starting a blog will transform your business AND your life.
Before you know it, you’ll have people around the world emailing you, following you on social media, and sharing your website with their friends.
Hands down, blogging is the BEST form of organic marketing out there. I’ve gotten access to millions of website visitors for FREE.
Today, I’m going to show you how to easily set up a WordPress blog using the best hosting provider out there, Bluehost.
I use Bluehost to host THIS blog and many of my other websites online. Their service allows me to host a website with thousands of daily visitors, without breaking the bank.
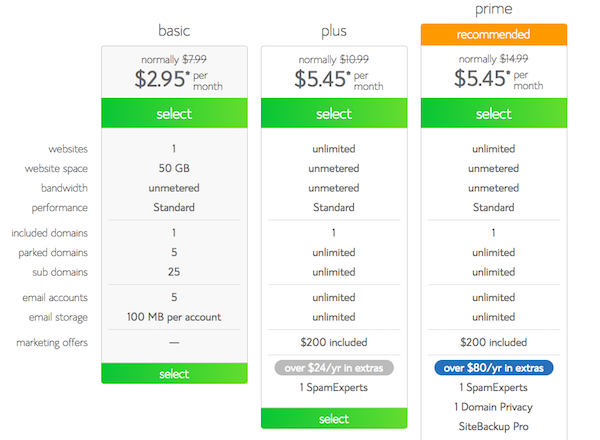
For the special CrowdCrux price of $2.95 per month, you’ll gain access to:
- A FREE domain and website builder
- Powerful one-click WordPress install engine
- 24/7 support
- 30 day money-back guarantee!
This is a special offer that they’re giving to fans of CrowdCrux.
You can get started now with no risk and no hassle. This is the first step for setting up your WordPress blog.
If you’re not used to spending money on your business, $2.95 per month might seem annoying, but it’s more than 50% OFF their usual price of $7.99 per month.
For that price, you’re getting robust hosting, an easy-to-use WordPress install engine, unlimited support, AND and a money-back guarantee.
Seriously, this is a steal.
Click here to start the process.
1. Register Your Domain Name
The first thing that you’re going to need is a domain name for your blog. This is what people will “type in the address bar” to come across your website.
You can get your domain name right here and start the blog.
It took me a while to settle on the domain name for my blog. I created a list of ideas and eventually settled on “CrowdCrux” because all of the other ones were taken.
The first part of the name “crowd” was going to be the focus of this blog… crowdfunding. It’s actually transformed into much more than that.
Now, I talk about building a crowd in general. How do you market your products, get your name out there, and grow a tribe of people who know, like, and trust you.
I chose the next part, “crux” because I wanted this website to be a hub of free educational content that people to use to get funding, grow their sales, and succeed in online business.
You can claim your domain name directly with Bluehost.
You’ll just have to pick which package you’d like to go with. All of the packages (when you use my special link) will unlock a discount for you.
I’m using one of the more expensive tiers because I want access to SiteBackup. I also have multiple websites hosted on my account.
The more that you grow your blog and your business, the more you’ll want to re-invest back into the company. It’s the formula for longterm growth.
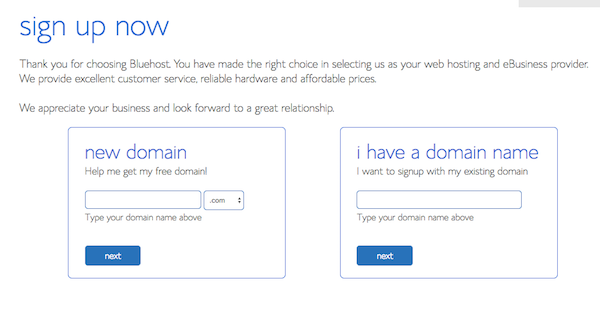
Once you select your tier, you can either:
- Claim a NEW domain name
- Assign your existing domain name
- Wait until later
Lastly, you’ll just have to put in your standard information and finalize your order. You’ll get the best possible pricing if you elect to choose the 36 month pricing package, at $2.95 per month or a total of $106.20.
This is one of the smartest decisions you can make. I’ve been with these guys for over 5 years and I wish I did this when I got started.
2. Buy Hosting For Your Blog
If you already have a domain name, or you didn’t go through every step above, you’re now going to have to buy hosting for your blog.
I know… hosting shouldn’t cost money, right?
Like… everything should just be FREE, right. Ughhh!
The problem with a service being “free” is that there is NO customer service, TERRIBLE product quality, and POOR upkeep/updates.
Quality solutions cost a little bit of money, because they are quality!
How annoying would it be to have your website down all the time?
Wouldn’t it suck to have no help setting up your site?
I don’t know about you, but I hate outdated software. It’s clunky, buggy, and doesn’t work well. That’s why I invest in robust hosting.
Let’s be honest, the $2.95 per month special price for the 36 month package is NOT going to break the bank. You really only need the basic plan to get started.
Usually, this hosting would cost a whopping $287.64 for the same timeframe. Today, you’re getting more than 50% off that price, which comes in at $106.20.
Of course, if you wanted to, you could “figure it all out” yourself. You could download the WordPress open source code base, figure out how to upload it to a server, and deal with all the troubleshooting yourself.
That option comes with a price… your time (and sanity)!
This blog hosting provider has a one-click WordPress install feature, so you don’t have to deal with any of that. It just works.
But, I don’t take for granted the decision you have in front of you now. Should you start a blog, should you hold off?
What if it doesn’t turn out the way you want? What if you’re not able to earn income? What if people laugh at you online!
I had all of these same worries, apprehensions, and fears when I got started. I thought that people were going to leave angry comments and make fun of me.
I can say unequivocally that this will be the BEST decision of your life. Not only can you earn good income and get free traffic, but if you pour your heart and soul into your content, people will love it!
I very rarely get a troll, and usually, the claims they make are so outlandish that it’s easy to just ignore them.
Blogging has allowed me to live a lifestyle where I can work from home (or anywhere), grow my revenue, drive traffic to new products, and instantly get credibility online.
Having one or two weird trolls a year is a small price to pay for the upside.
When you’re ready to start the blog, here are the steps for buying hosting:
- Go to Bluehost and click the green “get started now” button.
- Pick the package you’d like to go with
- Enter your desired FREE domain name (or assign one you already have)
- Put in your contact or business info
- Pay for your package
- You’re done!
3. Connect your domain name to your hosting account
If you followed my steps in point #2, you don’t have to pay attention to this section. You can skip it!
However, if you have a domain name with GoDaddy, 1&1, or some other registrar, you’re going to have to assign this domain name to your Bluehost hosting account.
It’s pretty easy to connect it. All you need to do is change your name servers (DNS) to:
- ns1.bluehost.com
- ns2.bluehost.com
The easiest way to do this is just to google “how to change name servers” for the domain registrar that you used. You could also google “how to connect Bluehost with…”
Once you change these name server entries on GoDaddy or 1&1, you just need to log into your Bluehost account, go to the addon domain tab, and add the domain to your account.
I know that this might seem overwhelming, but that’s why we’re using this hosting provider. They have 24/7 support!
Not only do they have a step-by-step outline of how to do this, but you can also call them up at any time and get guidance. You can even chat with them online.
These are the basic steps, summarized:
- Assign your GoDaddy, 1&1, or other domain name to Bluehost by pointing your DNS nameservers to ns1.bluehost.com and ns2.bluehost.com.
- Add your domain to the Bluehost hosting account by going to the addon domain section.
- You’re all good to go!
4. Install WordPress on Bluehost
WordPress is the “backend dashboard” of your blog. It’s responsible all of the functionality like:
- Publishing blog post
- Managing comments
- Generating visitor statistics
- Handling the “theme” or appearance of the blog
- Uploading images, videos, and more.
You’re getting this all free! It works right out of the box. All you have to do is turn it on.
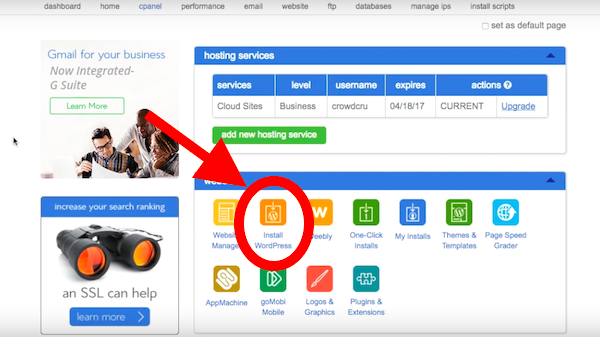
This literally takes seconds to install, thanks to the Bluehost one-click WordPress install feature. To get started, you’ll just click the one-click install feature from your cpanel menu.
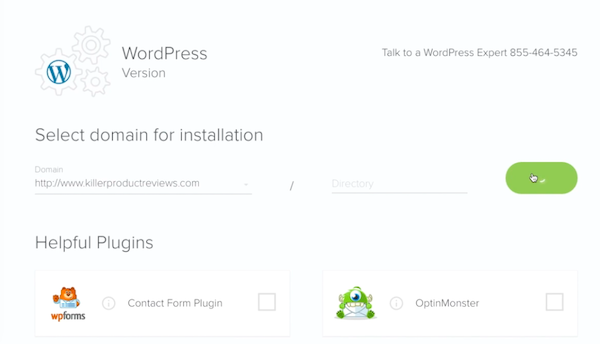
Then, you’ll pick the domain name that you want to install this on. It’s as easy as that! Make sure that you choose the correct domain name if you assigned multiple to your account.
While this is pretty simple, you can also get help and talk to a WordPress expert at any time. Just call the number and you’ll get in contact with a member of their support team.
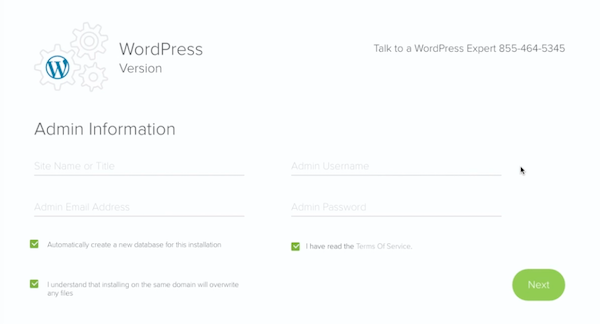
After you choose the primary domain name that you’ll be using for your blog, you just gotta enter some basic info, like the site title, etc.
You can always change this information later. I’ve changed my password over the years for security reasons and I have also changed the website title.
Remember, write down your username, password, and email address that you enter on this screen. You’ll be using this information later to log in to WordPress. You don’t want to lose it.
And…….. boom! You’re done.
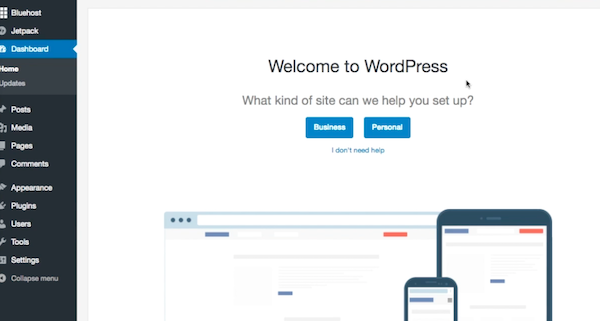
When you log in using your created username and password, your screen will look like the one below.
That wasn’t so bad, was it?
Before I leave you, I want to give you a quick primer on how WordPress works, so that you can get started blogging right now.
All of the main functionality for the WordPress dashboard is found on the left side of the screen. The top bar sort of functions as “short cut” links for common actions, like creating a post.
Basic WordPress terminology and vocabulary:
- Post: This is the actual blog post text. When you create a post, you’ll enter a title, message, and insert any media that you’d like. You can easily format it and see the chances in real time. Posts include categories, tags, and often times, a featured image.
- Page: The main difference between pages and post is that a post is a single piece of content, which resides in a certain “category” or in your post achieve. A page is a static page of your website, like your about page, and is usually found via your navigation menu.
- Comments: These are the responses that people write to you after reading your posts or pages. You can read through them, respond to them, and moderate them.
- Media: This is all of the images, video, and multimedia content that you use on your blog. You can insert this content into posts, pages, or link to it directly.
- Plugins: I was confused about these at first. Basically, plugins are little bits of code that you can install that will expand the functionality of your website beyond the standard WordPress functionality.
- Appearance: This is where the look and feel of your blog can be controlled. You can install free or premium WordPress themes to make your blog look more professional.
- Widgets: These will show up in the sidebar or other areas of your blog or website. You could put popular posts, archives, or subscription forms in your sidebar by the use of widgets.
When you’re just getting started with WordPress, the first features that usually snag your attention are themes and plugins.
 You can browse the free WordPress marketplace to look at all of the different themes that you have available to you.
At the same time, as we discussed before, free does come with a price. Usually, free themes are not very professional looking. They’re kind of amateur.
This is one reason that I recommend investing in a premium theme to make your website look like it cost thousands of dollars to make.
In reality… you probably only spent $50 on a nice-looking premium theme.
A marketplace like Themeforest is an amazing source of high quality premium themes. You can download most of them for between $20 – $50. Epic!
I actually used Themeforest to get a website theme for my personal blog. It looks amazing.
I hope you’ve found this step-by-step tutorial to be helpful!
For me, starting a blog has been a career-shifting decision that has led to so many incredibly opportunities.
If you want to get free traffic, grow a loyal following, and earn consistent income online, then you’re making the right decision!


