It goes without saying – you NEED a website asap.
But, not just any website. You need an online store where visitors can purchase or pre-order your products.
Trust me, this is a game changer. You’re going to look back on this decision as a defining moment in your online business career. This is when everything changes.
Above all, it should be easy to setup, simple to manage, and optimized to turn visitors into customers.
The website is an asset that generates sales. When used correctly, you can use it to build out a six or seven-figure ecommerce business.
Right now, I’m going to walk you step-by-step through how to set up YOUR online store using WordPress.
Very soon, you’re going to have a fully-functional online shop up and running so that you can take orders, grow your revenue, and scale your biz.
Step #1: How to Install WordPress (Easily)
There are many different ways that you can install WordPress, which powers the functionality of your online store.
I’m going to show you the easiest way, so that you can get it up and running quickly.
Rather than trying to “download” the entire WordPress code base and install it on some complex web server, I have a better solution.
I’ve been talking with the folks at Bluehost, the hosting provider I use, and they were kind enough to set up a special offer for the fans of CrowdCrux!
Right now, you can:
- Get a free domain
- Gain access to 24/7 support
- Unlock the rock solid 30 day money back guarantee
- And Install WordPress easily with the click of a button
This last feature is referred to as their “one-click WordPress install.” It will make it so that you literally can get it installed in a matter of minutes.
Normally, you’d be paying $7.99 or more for all of this functionality.
But, when you join today, you’ll get it all for only $2.95 per month!
Pretty cool, huh? You can learn more below…
I freakin’ love these guys. They’ve always been there to support my website, particularly when I have questions.
I use them to host all of my websites, including this one, which has gotten millions of page views since I started (and generated thousands of dollars in revenue).
When you sign up today, you’ll claim the special offer. You’ll also be supporting this blog!
I love putting out quality educational content. By using this link, you’ll support the community and I’ll get a tiny commission which goes toward creating even more free content for you.
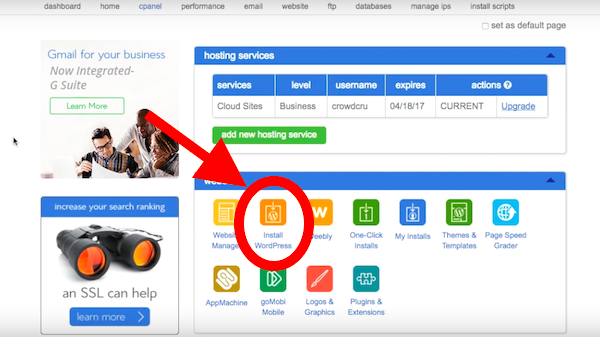
Now… when you log in with your username and password, go to the cPanel. This is the home screen for the hosting tab. From this panel, all that you need to do is click “Install WordPress.”

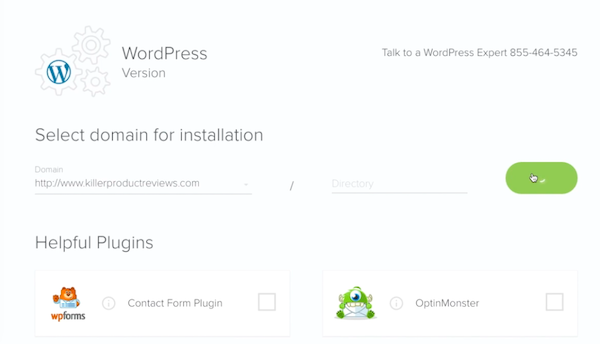
Next, you just need to pick which domain name you’d like to install WordPress on and in which directory. This could be the home directly or a special folder. I just used the home directory.
If you want to, you can also install some of the helpful plugins that they recommend.

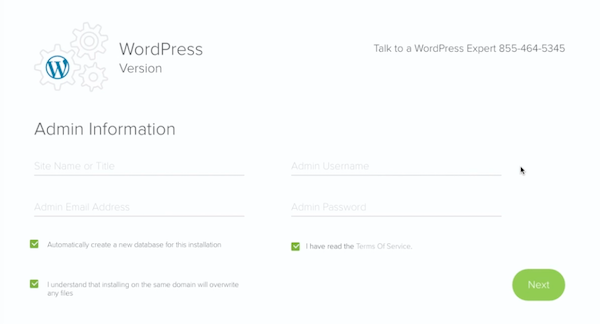
Last, you’ll be asked to provide some basic information about the Administrator account. This is how you’ll login to the WordPress dashboard.
Make sure to write down your username and password so that you can reference it later. You can always change your password or the site title.
If at any time you have questions, you can always talk to a WordPress expert on the phone.

And… that’s it!
You’ll then be able to log in to the WordPress dashboard using www.websitename.com/wp-admin.
Remember that you obviously have to replace this “websitename.com” url with your own. The /wp-admin is standard to log in to any WordPress website.

Pretty simple, right?
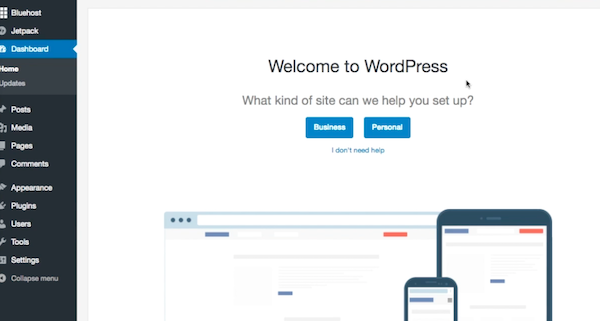
Then, when you log in, you’ll be presented with the beautiful, fresh WordPress dashboard which opens up a world of opportunity!
This dashboard represents the entire backend of your website. From the dashboard, you can upload themes, plugins, write posts, publish pages, and after step #2, you’ll be able to list products for sale!

Yup, it’s that easy. We did it in a matter of minutes.
If you haven’t already, go back to the beginning of this section and complete these steps. You’ll need to have WordPress installed for step #2, which is where the real fun begins.
In step #2, we’ll set up your website so that you can list products, accept payments, and start to generate revenue from your online store.
Step #2: How to Sell Products Online (and Accept Payments)
Now that you’ve set up WordPress, it’s time to enable ecommerce functionality so that you can generate revenue from the website.
We’re going to do this by installing the plugin, WooCommerce.
If you’re not familiar, a plugin is simply a bit of code that you can easily install to add functionality to your WordPress website.
Think of it like legos… you can put legos together to build cool things or expand on what you already have.
The WooCommerce plugin powers 28% of online stores and has been downloaded more than 32 million times. It is literally the most popular ecommerce plugin on the web.

You can use this plugin to sell anything online including physical products, digital products, content, and more.
It allows you to configure a lot of the nitty gritty details when it comes to sales, like taxes, shipping, payment processing, variations of products, inventory management, and more.
To get started, all you gotta do is navigate to the plugins section of your WordPress dashboard and click “add new.” Then, search for the WooCommerce plugin and click “install.”

You’ll have to activate the plugin once it’s installed. The second that you activate it, you’ll be prompted to fill out a bunch of information related to your online store. This includes setting up your location, payment, shipping, and more.

After you input your store’s location, you’ll be promoted to set up the payment processing for your store. This is exciting! You’ll soon be able to accept payments from customers.
You can accept payments using PayPal, Stripe, or through offline payments (check, bank transfer).

Finally, if you choose to, you can install the recommended extras. This could include automatic tax collection. This helps you charge the correct tax rate every time a customer checks out. You can imagine how that would save ya a lot of time!

And before you know it, you now have an online store!
You can go ahead and create your first product. Just customize the title, description, category, images, and the product data.

One of the cool things about WooCommerce is that you can sell multiple different types of products using the plugin. You can also do up-sells, cross-sells, and have “sales.”
This is all found within the product data, right below the description section. You can customize the price, shipping, and inventory data.

Lastly, along with doing ALL THIS you can also get reports with WooCommerce. All you need to do is go to the reports tab. You’ll be able to see graphs on your sales, refunds, orders placed, and more.

Okay… now that you got all this set up, you can sell products, accept payments, and track all of it in one handy dandy dashboard.
Wasn’t that easier than you thought? We just installed one plugin!
If you have any questions, there is a great WooCommerce tutorial that walks you step-by-step through how to create a product and manage the plugin.
Having a website and an online store is the first step towards success online, but in order to maximize your profits, you’re going to need to know how to convert your website visitors into customers.
Thankfully, there are a few easy ways to do this, which I’ll be sharing down below in step #3.
Step #3: How to Convert Visitors into Customers (and Grow Your Revenue)
I’ve shown you how to set up an asset… your website!
Now it’s time to supercharge your store so that you can generate revenue and get a consistent stream of customers buying whatever you’re selling online.
Aside from generating more traffic, selling different products, or improving your copywriting and images, there are TWO main ways to make your store more profitable.
First, is the actual design of your store. This significantly impacts your conversion metrics. A amateur-looking store will turn away customers and raise suspicions about the quality of your business.
Years ago, you’d have to hire an expensive designer to build you a custom website design, but not any more!
There are tons and tons of WordPress themes that are specifically tailored to look good for a Woocommerce store. Most of these come in at less than $100.
For example, the Vitrine theme on Themeforest looks epic, and it’s only $49! You can see what it looks like below.
You can discover a lot of professional themes like this by just logging on to Themeforest and typing in “Woocommerce.”
Another example is the Bigshop theme, which looks like it costed thousands of dollars to create, but in reality, it’s only $59.
Selecting a professional theme is an easy first step towards converting more website visitors into customers. You won’t just come off as another amateur website builder. Instead, it will look like your website offers quality products (which it does).
Once you’ve done this, then it’s time to enhance your website even further.
There is critical functionality that you can install through the use of other plugins that extend the functionality of WooCommerce.
You can find some of these extensions on the WooCommerce website. One example is the “WooCommerce Checkout Add-Ons” extension, which makes it easy to make free or paid add-ons available upon checkout.
This is one simple way to boost your total revenue by boosting your store’s average order value. It’s kind of like being able to ask… “Would you like fry and a drink with that?”
We all know that when you simply get a hamburger at McDonalds, it’s not that much. However, when you add fries and a drink, it significant increases your order value and the profitability of that order.
You can also search on google for WooCommerce plugins, like “Abandoned Cart Lite for WooCommerce” which allows you to send emails to people who abandon their cart during the checkout process.
By some estimates, online stores have a 70% cart abandonment rate. There are tons of customers that you’re missing out on!
Rather than paying to send new customers to your store, work off of your existing customers that are interested, but just need a bit of convincing and reminding.
You can use a plugin like the one mentioned above to accomplish this.
Ready to Get Started Now?
It’s time to get started and FINALLY start your online store!
Just think how amazing it will feel to run your own business and sell products that you believe in.
What would it be like to wake up, actually excited for work?
How cool would it be to be able to work from anywhere and be your own boss?
It’s 100% possible and, as I’ve shown you, you can do it faster than you might think.
The first step is to install WordPress, the engine that powers your entire website.
Since you’re a fan of CrowdCrux, you can get started for only $2.95 per month.
Don’t wait!
Opportunities come and go. Right now, ecommerce is a hot industry. Within a few years, it could have already died down.
I hope you enjoyed this post!


